Unknown's avatar

About Anna Papoutsakis

Chef. Writer. Cater. Editor. Culinary Badass.

Summer Lentil Salad

IMG_3955

I love lentils. I believe I have mentioned this numerous times. They are healthy, a great source of protein, and versatile.

This time of year as the weather gets warmer and I like to cook a bit less, I like batch cooking once or twice a week to have lunch for work or a quick meal to share. In comes Lentil Salad. You can put pretty much what you want and it will last about a week in the fridge.


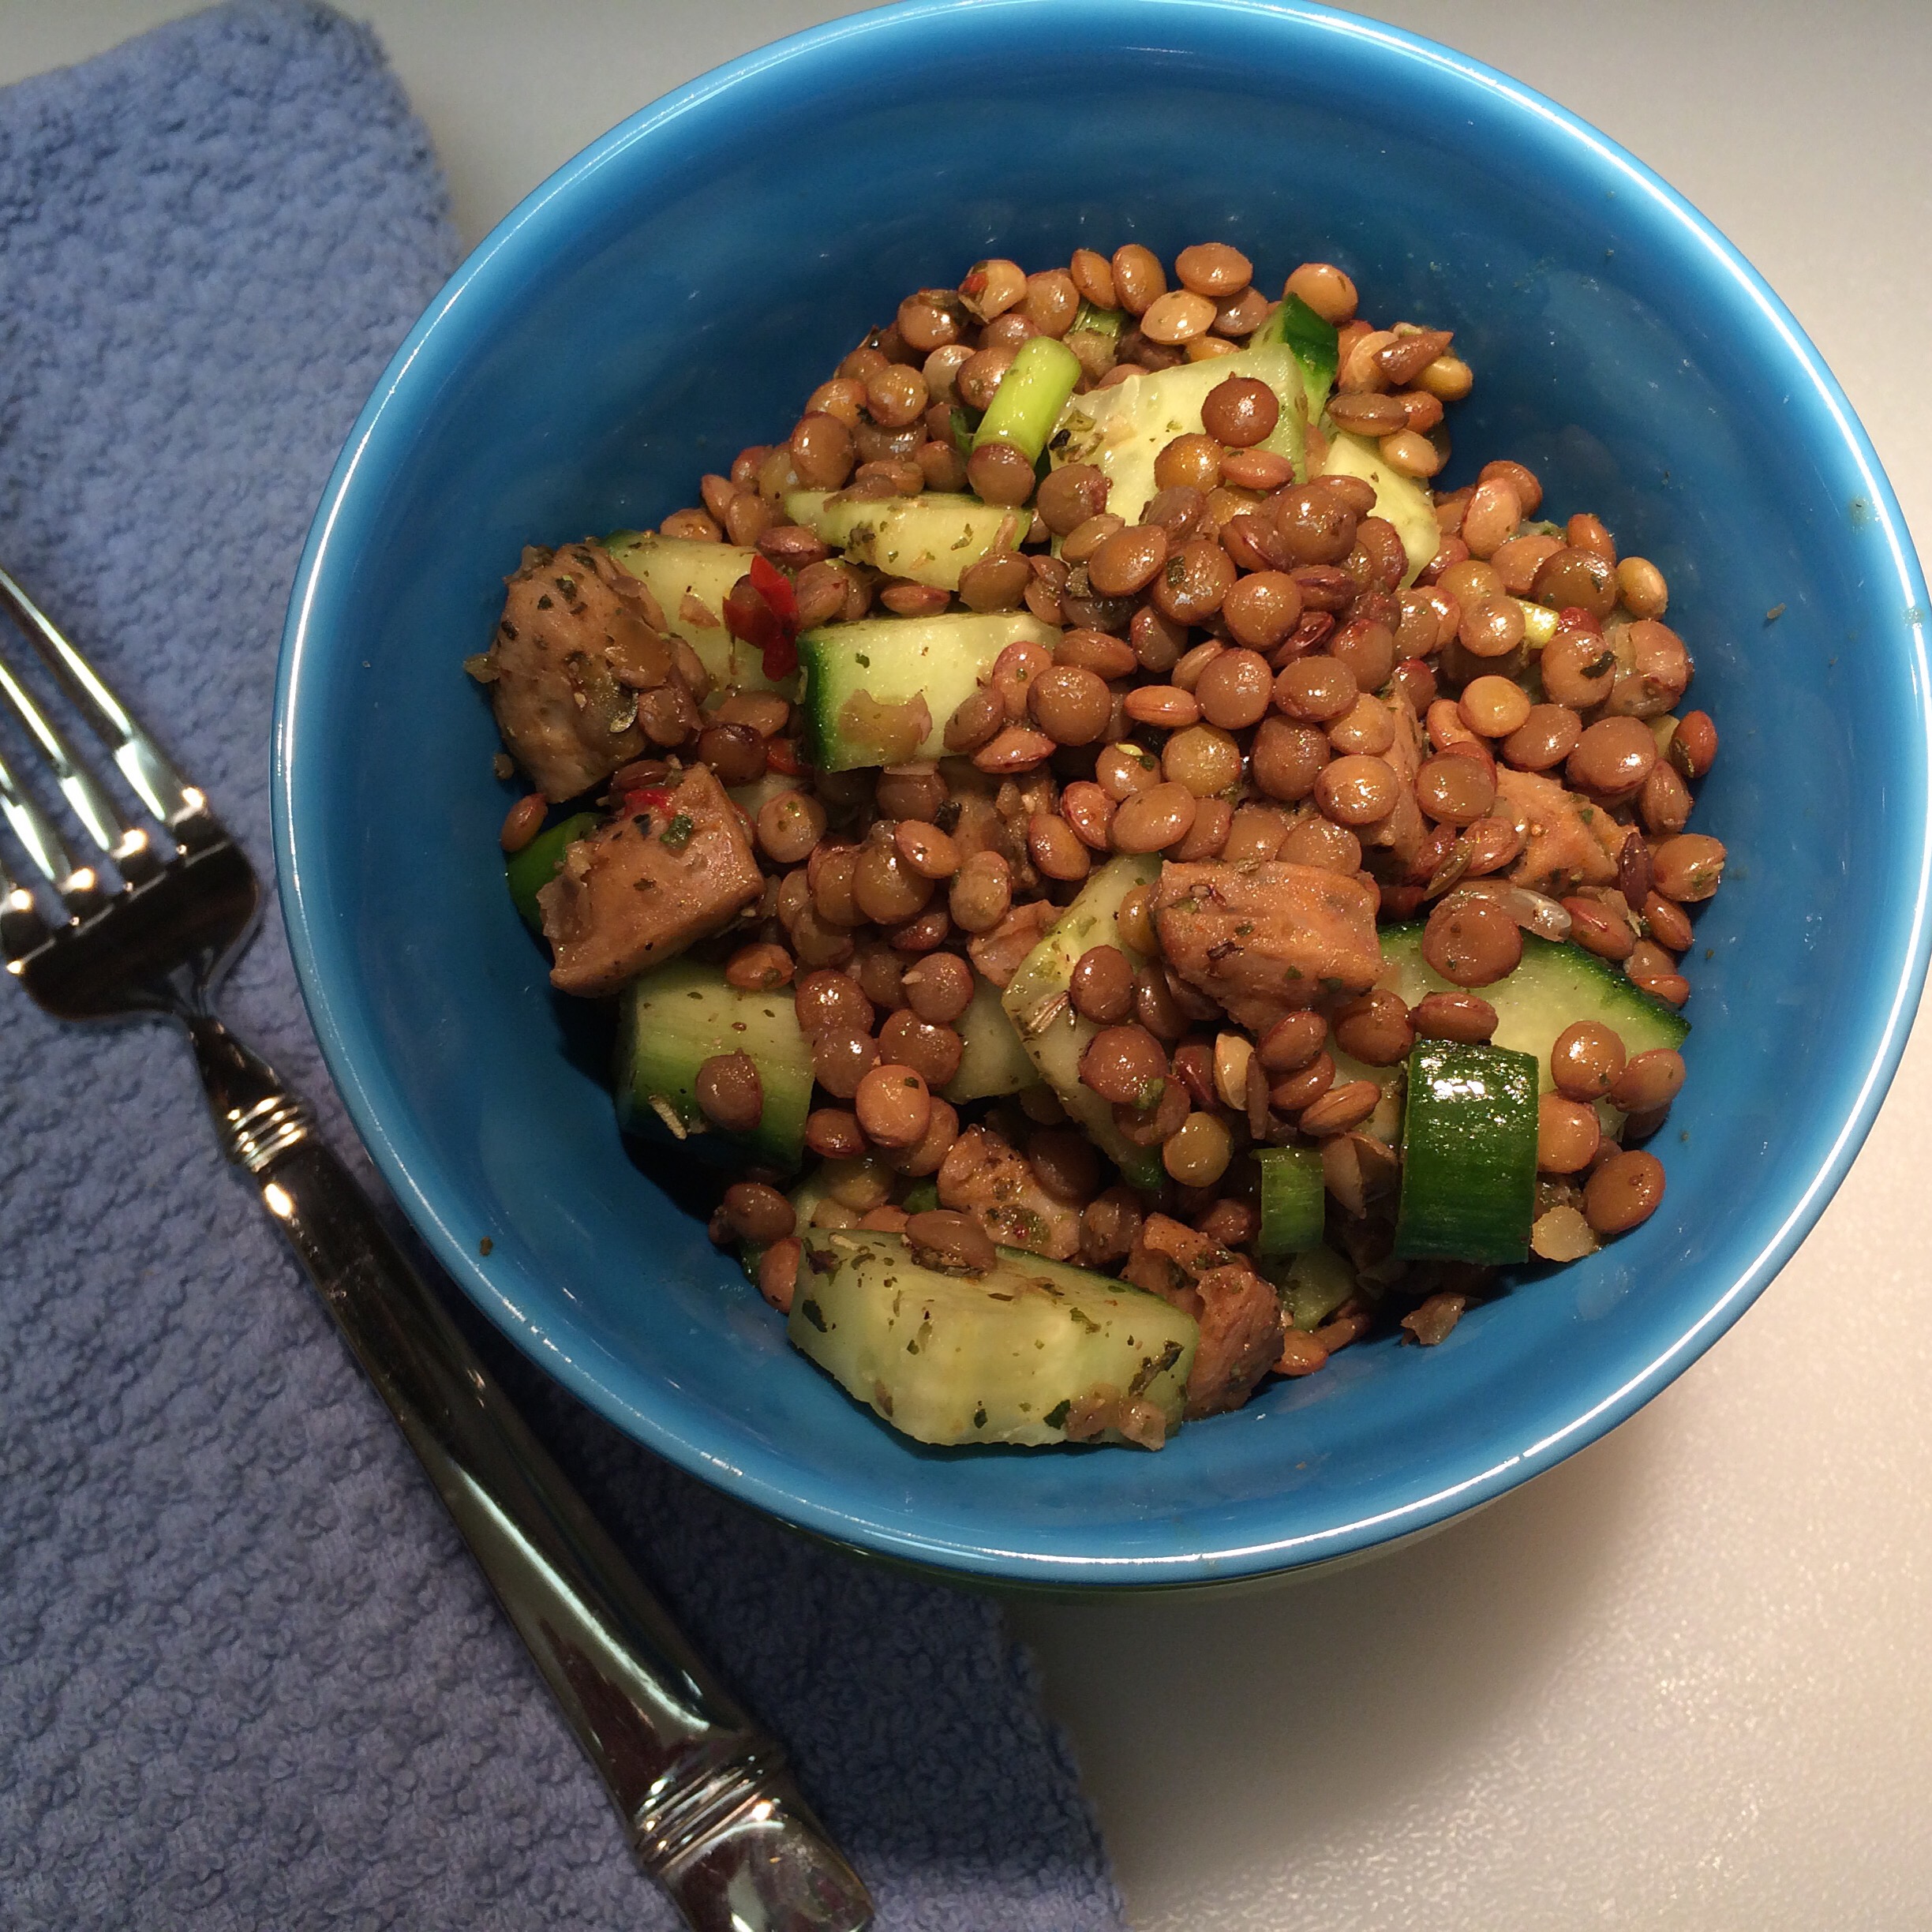
Another great thing about it is that I don’t have a precise recipe. It’s really something I whip together. I think the only constant is lentils and a balsamic vinaigrette.

Here’s what I used in my salad:

  • Greek Lentils (cooked al dente and cooled)
  • Chicken Sauasage (sliced, browned in a pan with a little oil and cooled)
  • Scallions
  • Diced Cucumbers
  • Olive Oil
  • Balsamic Vinegar
  • Italian Seasoning
  • Salt and Pepper

Toss it all together and you have your meal! It can be served cool or room temperature. Feel free to experiment! Veggies, goat cheese, ham, other meats, different dressings…just have fun with it!

Have Potatoes, Will Focaccia

 
I have this tendency to buy potatoes and not use them before they get gross.

Even though we’ve been experiencing 80+ degree days here in New Jersey, I was feeling the urge to bake.

  
One of my go-tos that I don’t do often enough is focaccia. It’s a pretty easy pantry staple because all you really need is flour, oil, salt, sugar, and yeast. It’s a quick bread to make – about two hours to do, and about 90 minutes of that is just hanging out and waiting.

For a moister, fluffier center and chewy-crunch crust, potatoes are also used. My inspiration for this focaccia came from a Bon Appetit recipe from a few years ago. I modified it this time around, omitting the seasonings/toppings. I opted for a Rosemary-rich Italian seasoning blend and Parmesan cheese. 

Focaccia also makes a great Accidental Pantry Project Recipe – you do not need potatoes, but they do make a better bread. The rest is pretty much stuff you have around – flour, yeast packets, sugar or honey, oil, and water. 

Follow the rest of the recipe accordingly.

Homemade Coconut Oil Chocolate with Fleur de Sel


I have been on a huge coconut oil kick lately. I first learned about the benefits years ago when I was a writer for the eco-living site Ideal Bite. It is truly a superfood.

Lately I have been using it more as a supplement and in my cooking as it is supposed to be a metabolism booster. I use it to make popcorn, I’ve had it in coffee, and I like a little in my morning smoothies. It appears to be working because I find my jeans being looser without a drastic change in diet.

I came across this chocolate recipe on Pinterest and decided to give it a try, but I took it a step further with cacao nibs instead of organic cocoa powder. The main reason being while I had both nibs and powder at home, I had more nibs than I knew what to do with.

  
The goods – coconut oil, honey, cacao nibs, vanilla extract, and fleur de sel. 

 I pulverized about a cup of nibs in my food processor. The texture was still grainier than I wanted so I mixed in about 1/4 cup of honey.
  
The honey made the mixture much smoother and I hoped the heat from the oil and stove would help smooth it out.


I heated the oil until warm (I was scared the chocolate would fry) and whisked in the cacao and honey mixture. It was not incorporating as much as I wanted and it wasn’t sweet at all. I ended up using the full amount of sweetener the recipe suggested – 3/4 of a cup (I mixed maple syrup with the honey), and it helped it all come together like a sauce. I added in about a tablespoon of vanilla. I love vanilla and always use more than a recipe calls for. 

  
I was now ready to cool it. 

 
I lined a pan with plastic wrap and poured out the chocolate.

  I then let it set for a moment and sprinkled it with the fleur de sel.

   Chocolate is ready to cool and harden in the fridge!

 
Texture is slightly fudgier than I intended. Next time I will lesson the oil and increase the cacao. 

French Onion Soup Empanadas

IMG_3955

On numerous occasions on this blog I gushed about my love of French Onion Soup. It’s somewhat of an obsession.

One of my other loves in any food that’s wrapped in dough – be it puff pastry, filo, pasta, etc. I’ll travel the culinary world for a good dumpling, pierogi, patty, lumpia, pita, etc. Of course, empanadas are no exception.

Last weekend a good friend of mine sent a snapchat of some empanadas he was frying up, and I was smitten, realizing it had been a long time since I made them myself. His sister’s Ecuadorian in-laws noddingly approved of his frying skills. I instantly knew I wanted to achieve similar greatness.

Apparently the secret was Goya empanada wrappers. I bought some the next day and saved them in my freezer until inspiration struck.

A few days later the idea of French Onion Soup Empanadas came to mind. I had two additional inspirations on top of that snap chat – a French Onion Soup Casserole I saw on Pinterest and the famous French Onion Soup Dumplings at The Stanton Social.

By not making empanada dough from scratch, these were super easy to make.

FRENCH ONION SOUP EMPANADAS
3 large Sweet or Vidalia Onions, sliced thick
1 stick Butter
1 tablespoon Herbs de Provence
1 teaspoon Thyme
1 tablespoon Beef Better than Bouillon (or 1 Beef Bouillon Cube)
2 tablespoons Flour
1 cup White Wine (or Brandy)
Salt and Pepper, to taste
4 ounces Jarslberg Cheese, sliced into small squares
1 packet (12 each) Goya Empanada Wrappers
Vegetable or Corn Oil for Frying
Sugar and Parmesan Cheese

  1. Remove wrappers from freezer and allow to thaw while you prepare onions.
  2. In a heavy bottom stock pot or dutch oven (I used my Staub coquette), melt the butter. Add onions and spices. Cook onions, stirring occasionally, for about 30 minutes, until onions are brown and a little syrupy.
  3. Add flour and stir for a couple of minutes until well incorporated.
  4. Add wine and cook mixture for about five more minutes, until onion mixture has thickened and excess liquid has evaporated. Remove from heat and spread on a cookie sheet or pan to cool.
  5. Meanwhile, heat oil in pot (I cleaned and re-used my coquette). Use a candy thermometer and allow to heat between 320 and 350 degrees.
  6. Assemble empanadas – use about two tablespoons of onion mixture and 1-2 squares of cheese. Fold in half and crimp edges closed with fork.
  7. Fry empanadas for about 3-5 minutes, until golden brown to brown.
  8. Remove from fryer and drain on a paper towel. While still hot, sprinkle with a pinch of Parmesan cheese and sugar.


Not Cooking With As Much Innovation Lately

chef's journal

The past few weeks at work have been a blur and I found that I am not doing anything particularly exciting in the kitchen, which makes me a little sad because I committed to keeping up with my writing and cooking.

Some highlights of what I have done lately:

  • Breakfast smoothies – almost every morning for protein and vitamins – usually a mix of frozen fruit, almond milk, Greek yogurt, and some sort of berry juice. I bought my Vitamix just over a year ago and use it several times a week
  • Eggrolls – I have done baked steak eggrolls and fried pork eggrolls. I am enjoying frying in my cast iron skillet. An easy and quick dipping sauce is taking store bought duck sauce and thinning it with a bit of Sriracha. It effortlessly elevates the quality and complexity of the sauce
  • Baked Potato Soup – revisiting my old recipe using my new Staub coquette

More inspiration to come soon as I am going to visit London and Paris in less than a month!

Kale Crackers

chef's journal

Last night I played around with making this Kale Cracker recipe I read on Pinterest. I do not own a food dehydrator, but now I want one! These came out so crunchy, and I love the seasonings I used.

I followed the recipe as they said, but made a few substitutions.

  • I used ground chia instead of ground flax – purely because of what I had on hand at home
  • For seasonings, I did not have smoked paprika or chipotle – I used Sriracha and regular paprika
  • Rather than processing my own almonds, I used almond meal
  • I doubled the amount of kale in the recipe, and used baby kale
  • Since I do not have a food dehydrator, I dehydrated these overnight in my oven’s lowest temp – 170 degrees

IMG_4325

Vegan Creamed Kale

IMG_3955

Months ago I tried a vegan version of creamed kale and it stayed with me – I really wanted to replicate the side dish. In usual fashion I bought too much kale recently and pondered what to do with it, so I decided to take a stab at it. I picked apart some recipes on Pinterest and came up with my own.

IMG_4300

The first thing you need is your cream sauce. I do not know why these ingredients combined together mean magic, but they just do:

VEGAN CREAM SAUCE

1/4 cup homemade cashew butter
1 cup unsweetened plain almond milk (I prefer almond breeze)
1/2 cup nutritional yeast flakes (I use red star)
Nutmeg, Salt and Pepper – to taste

In a medium sized saucepan, melt the cashew butter over a low flame – do not allow to scorch. Add almond milk and whisk mixture together until well incorporated and smooth. You can raise the heat to medium and add yeast flakes and seasonings – adjust to your liking. Personally, it needs a good amount of salt. Cool and set aside to use in recipes immediately, or you can refrigerate for up to one week – makes a great pasta sauce as well!

VEGAN CREAMED KALE

1/2 onion, chopped
1 clove garlic, crushed
1 tablespoon coconut oil
4 cups baby Kale
1/2 cup – 1 cup Vegan Cream Sauce

Over high heat, heat coconut oil in a large, heavy bottomed skillet. Add onions and lightly saute, until softened and slightly translucent. Add garlic and kale and mix with onion. Lower heat and cover skillet for about two minutes, allowing the kale to steam. You can steam longer if you prefer softer vegetables. Remove lid and add cream sauce, mix until all the kale is coated and hot, about one minute. Serve with your favorite vegan entree or just enjoy on its own!

Sangria Pork Tacos

Some girlfriends and I went to dinner the other night at  Casual Habana Cafe
here in Hackensack. I highly recommend the restaurant, their food is amazing!

I ordered the baby Pernil and got a huge shank. After amazing apps and salad and tostones I took most of the pork home, contemplating what I would do with it. 


I had a bunch of citrus fruit but I used it to make a batch of sangria. Rummaging through my fridge I came up with a plan – tacos!

The sangria was going to give me everything I wanted in a braising liquid for the pork – wine to tenderize and lots of fruit and flavor! I poured about a third of a cup in a small skillet, shredded the pork off the bone, and cooked it covered over a low flame for about 15 minutes. I then uncovered it and raised the heat until the liquid evaporated.

Meanwhile, I warmed corn tortillas with some cheddar Jack cheese in the middle. I then tossed some greens with a squeeze of lime (shamefully I picked the lime out of my sangria but it kind of worked!). Dinner, boom.


Chicken Parm Casserole for One


Now that I’m working in a mall I often am so busy I forget to eat. When I do it tends to be nasty mall food, which is just sucky.

So I had a super long day today but refused to buy something for dinner. Instead I did a quick fridge and freezer rummage and came up with this Chicken Parm Casserole. It was about 25 minutes of prep (mainly inactive) and about 10 minutes in the oven.

I baked two frozen chicken fingers while I boiled the pasta (I used half a cup of whole wheat elbow macaroni). When the pasta was done, I drained it and placed it into a small casserole dish. I mixed in about 1/2 cup Rao’s marinara sauce and a couple of dollops of part skim ricotta. I then took the chicken fingers out of the oven, diced them up, and covered with a bit more sauce and shredded Italian blend cheese. I then baked it in the oven about 10 minutes until the cheese melted.

It’s not a diet dish, but it is way more wholesome and natural than takeout!


Baked Potato Soup 


With winter coming to a close (hopefully) I decided to give baked potato soup a whirl. Whenever I go to Houlihan’s it is my favorite soup to order but for some reason I never thought to make it.

I looked up some recipes but I was not totally sold on anyone in particular so I modified and came up with my own.

In all honestly I needed an excuse to use the grill press that I bought as my first employee purchase from Sur La Table.


To make the soup I cooked about 11 slices of thick cut applewood smoked bacon and I reserved about a quarter cup of the bacon grease. I chopped one small yellow onion and threw in some garlic, seasoning the mixture with salt-and-pepper. After the onions got soft I added a few tablespoons of flour and started to create a roux. 

I then added 32 ounces of chicken broth and six chopped and peeled russet potatoes. I let the mixture boil then simmer about half an hour until the potatoes were soft. I then added a cup of warm milk (I was scared cold milk would curdle) and adjusted the seasonings. The soup definitely needed more salt because I forgot how much the potatoes absorb. I also added about a cup of chopped scallions and then my crumbled bacon which I had reserved on the side. That was pretty much it and it was really only about an hour for the whole process.

To serve I just added a little bit more scallion and shredded cheddar. So yummy and boyfriend approved. ☺️