Chicken Meatballs Piccata

IMG_4485

I often have frozen chicken breasts in my freezer, as well as chopped parsley. Pretty much everything in this recipe are common staples in my kitchen, and many folks have in their kitchen. I often get bored of grilling chicken breasts or making them tenders, so I will grind the meat in my food processor and use it for ground meat recipes. You can freeze meatballs to use at a later time, and this is a super fast weeknight dinner.

IMG_4959IMG_4958

Chicken Meatballs Piccata

Makes 4-6 servings
MEATBALLS
1 pound ground chicken breast
1/4 – 1/2 cup plain breadcrumbs, as needed
1 egg, beaten
Handful chopped parsley
I small onion, finely diced or grated
1/4 cup grated Parmesan cheese
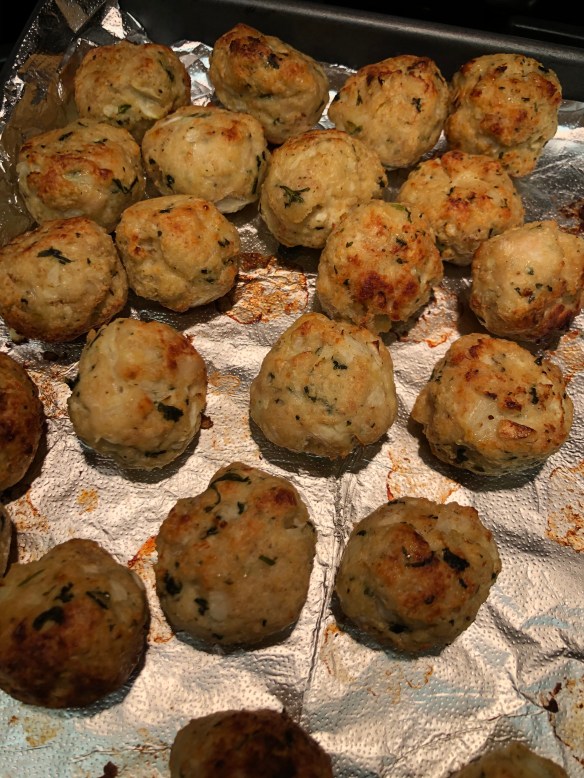
Salt and Pepper, to taste

Mix ingredients until fully incorporated, starting with 1/4 cup breadcrumbs. If mixture feels too wet, add a bit more. Shape into 1.5 – 2 inch balls. Arrange on a baking sheet lined with foil or parchment paper. Broil on high about 10 minutes, turning halfway through cooking for even browning. Set aside. Note – these can be done ahead of time and frozen or chilled.

PICCATA SAUCE
4 tablespoons butter
4 tablespoons all purpose flour
2 lemons, juiced, plus zest from one
1.5 cups chicken broth, warmed
Salt and Pepper, to taste
2 tablespoons capers, or more, as desired

SPAGHETTI
1 pound – cook to package directions.

GREENS
Greens – spinach, arugula, kale, etc – as little or as much as you want. You may also substitute additional vegetables for a more complete meal.

Mix lemon juice, zest, and broth. Heat until warm or hot, set aside. On medium heat, butter in saucepan and whisk in flour about one tablespoon at a time, until fully incorporated. Cook about 3-4 minutes, do not brown. Slowly whisk in broth mixture, a little at a time, sauce will thicken immediately. Cook 2-3 minutes, season with salt and pepper. Add capers and meatballs. Remove from heat.

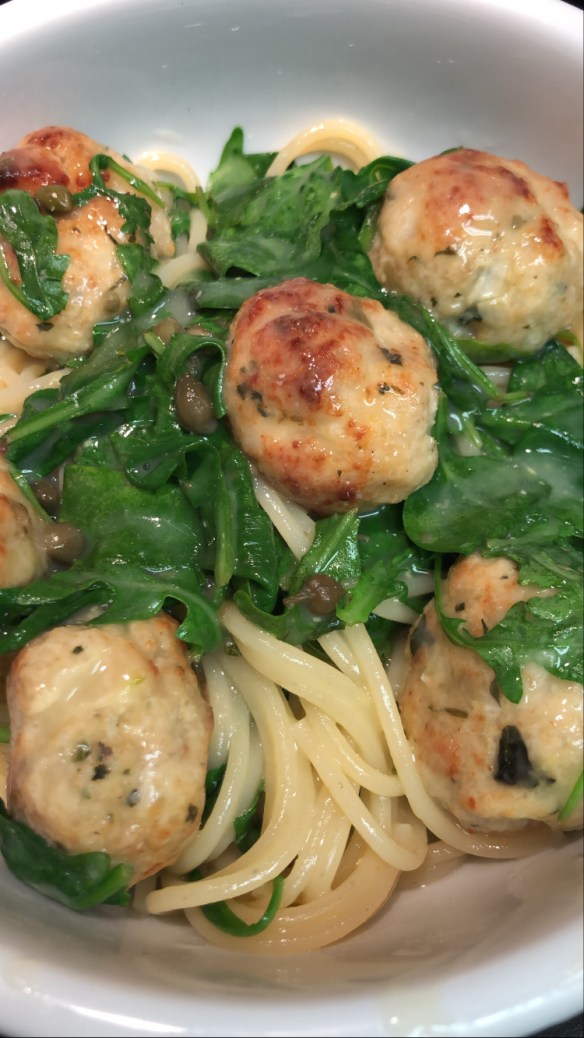
For greens, heat a small amount of sauce and sauté until soft. To serve, arrange a serving of spaghetti in a bowl, top with sauce, some greens and then a few meatballs. Enjoy!

Advertisement

Hunkering Down – Smarter Food Shopping

IMG_5132

This morning over a “diner style” breakfast of eggs, bacon, and hashbrowns, my boyfriend asked me, “How are you able to have so much fresh stuff on hand to cook with? Aren’t you scared it’s going to go bad?” I told him I’m not.

Friends – it’s strategy. While in an ideal, healthy world it’s great to hit up the grocery store several days a week and get the freshest ingredients possible for you and your family, these are unusual times. All the warnings we have gotten the last couple of days is it will get worse before it gets better – this pandemic and the crisis in our area has not peaked, we could be weeks, probably longer, from leveling that curve. In Bergen County, New Jersey, where I live, we have the highest number of coronavirus cases in New Jersey, and we are only a few miles from New York City, which is currently the unfortunate epicenter of the pandemic. Our county parks have closed, and all the warnings heed staying home as much as possible, only go out if you absolutely have to.

66AB955C-1D65-4D7B-9DCC-141FC3FD0270

“Diner-Style” Breakfast – all long shelf life ingredients – eggs, cheddar cheese, bacon, and frozen hash browns

Part of staying healthy is following a healthy diet. You have the most control when you’re preparing your own food, and avoid processed ingredients as much as you can. This can be difficult when you’re stockpiling for days and ideally, weeks, but the good news it’s not impossible.

In addition to the hefty amount of items I currently house in my pantry, today I stockpiled fresh foods. I do not intend to go to a grocery store again for a couple of weeks minimum. The key to doing this is to choose items that have a long shelf life, or things that can freeze beautifully.

Don’t know where to start? Here are some of my go-to’s and how long they could last, if properly stored. This isn’t a comprehensive list of all the foods out there, but it can get you through several weeks and possibly even months without a grocery trip.

  • PRODUCE
    • Citrus fruits – 3-4 weeks
    • Butternut Squash – left whole, this will keep about a month
    • Onions and Garlic – about two months
    • Cabbage – several weeks up to 2 montns
    • Carrots – lasts 3-5 weeks
    • Cruciferous vegetables (Broccoli, Cauliflower, Brussels Sprouts, etc) – up to 2 weeks
    • Bananas – last about a week if “green” when purchased. Freeze well
    • Hearty Greens (Kale, Arugula, etc) – these raw veggies will usually last about a week to 10 days
    • When in doubt, buy frozen – especially berries as they are highly perishable. Plus frozen produce is almost always as nutritious as fresh
  • DAIRY
    • Organic milk – ultra pasteurized milk will last about two months
    • Hard Cheeses – parmesan, etc. can last for a couple of months
    • Yogurt – if unopened, can be eaten a couple of weeks after sell-by date
    • Sour Cream – similar to yogurt
    • Cream Cheese – months
    • Semi-hard Cheeses (cheddar, mozzarella, swiss, etc) – months. These also freeze well
    • Eggs – usually will last a few weeks after sell-by date. Try this water test to be certain of the freshness
  • MEAT
    • Vacuum-sealed meats typically have a much longer shelf life than what the butcher will cut and package for you. For example, I purchased a couple of ribeye steaks today that are vacuum-sealed has have a USE BY or FREEZE date of April 22. That’s nearly a month!
    • Poultry is typically more perishable than beef, pork, lamb, etc. If you’re not planning on using within 3-5 days, I suggest freezing until you’re ready to cook with it
    • Cured meats – bacon, ham, sausages, etc. naturally have a longer shelf life. Some will even last months and all typically freeze well
  • SEAFOOD
    • I avoid buying fresh fish and seafood if I’m not going to cook it within a day of purchase. If I find a sale, I may purchase and cut/portion out myself and wrap to freeze. I especially like to do this with salmon. I will take the fish out of the freezer when I’m ready to actually use it
    • Shrimp is something I almost always have in my freezer. In some water they take next to no time to thaw and also cook up super fast. Plus, in this country almost all the “fresh” shrimp you buy has been previously frozen, so just skip that and buy already frozen
  • BREADS/BAKED GOODS
    • I will typically bake my own stuff, but I don’t make sandwich bread. English muffins will keep for weeks in the fridge. I also really like rye bread in the fridge. Tortillas and wraps typically have a long shelf life (possibly months). Softer breads (white, whole wheat, etc), if you’re not going through them quickly, freeze well. Double check the shelf life. While organic can be better for you and have fewer preservatives, organic sandwich bread gets moldy FAST.

Bottom line – in these unprecedented times, don’t impulse shop. A little planning will keep you home safe for a very long time 🙂


Homemade Kale Chips

IMG_5132

I am not vegan. I am not gluten-free. However, being omnivorous, I enjoy all these things. Back in the years I worked for Whole Foods Market, one of my favorite indulgences (as a price point, not calorie/junk indulgence) was Brad’s Kale Chips, not known as Brad’s Crunchy Kale. The product is amazing, healthy, all-natural, and most importantly, tasty. No offense to Brad, they are pretty darn easy to replicate.

I cannot take credit for the recipe I am going to share, but I will show you step by step in this video how easy they are to make and how little equipment is really needed (no need to invest in a dehydrator!)

Recipe can be found at Kitchn 

PS- the “ranch” version I made is not vegan. Please double check ingredients if you’re using a ranch dip/dressing packet. Buttermilk is one of the key ingredients in ranch dressing, and packets usually have some form of dehydrated milk solids.

“Ask Anna” – Flour Tortilla Chips

Untitled Design

Last week, I encouraged friends, family, and readers to reach out with any cooking questions or ways to utilize ingredients. One of my close childhood friends, Jen, reached out with this pic of flour tortillas, feeling a bit uninspired but not wanting to be wasteful as they reached their “Best By” date.

77d41748-10a7-4d00-bdf3-0e1bedeff66c

After throwing out a few ideas, she was intrigued by the simplicity of making chips. Since flour tortillas are not as common a chip and corn tortillas, it had not crossed her mind.

FLOUR TORTILLA CHIPS

This recipe is technique more than quantities. At minimum, the tortillas and some olive oil and salt. Brush the tortillas on both sides with olive oil, cut into desired strips or wedges, and sprinkle with salt.

Bake at 350 for about 8-10 minutes, flipping halfway until golden brown and the chips still have some “give” or a touch of softness. This is an important step as you don’t want to overbake! These will harden as they cool.

Remove from oven, place on cooling racks and allow to cool before serving or storing. Store in an airtight container up to one week! (Assuming they last that long). To prolong freshness, invest in some silica gel packs to absorb any moisture.

You may play around with different flavors like other oils, spices, and seasonings! Get creative and enjoy!

647b2ba5-9ccc-4b17-9016-28ee68ae6666

My star pupil prepping the chips for the oven

eb774beb-2b4e-4295-a12d-80fc50788905

Just a little longer!

5a95b87c-be74-4f41-bbb2-1f2328f62422

Done!

041b66d4-7b82-4eed-9021-6049de573cd2

Mommy and me approved snack!


Gluten-Free Butterscotch Chocolate Chip Banana Bread

AC_PANTRYPROJECT

One thing I like to do as I am utilizing what is in my pantry is use up items I do not particularly care for, or I can’t quite remember why I bought it. I found a box of live Gfree gluten-free baking mix. Live Gfree is Aldi’s line of gluten-free grocery products. While I joke that enjoy a gluten-FULL diet, I particularly enjoy gluten-free pretzels – they have a nicer, lighter crunch than regular pretzels.

IMG_6643

Main Ingredients – all things on hand – previously frozen, thawed bananas, gluten-free baking mix, and a mix of chocolate and butterscotch chips

For the baking mix, I wasn’t sure what to do. Reading the recipes on the back, it was like Bisquick. With the pandemic looming I’m either by myself or with my boyfriend, so I didn’t want to make something like pancakes or waffles, it felt wasteful.

Rummaging through my supplies, I opted for a banana bread. Banana bread is one of those foods that is really the kitchen sink of breakfast or coffee pastries. You can throw in just about anything and it will still be good.

In my cabinet I had some loose chocolate chips and butterscotch chips mixed in zipper baggie together – a combination I often use in blondies. In my freezer I had about 3 frozen bananas – something I usually save for smoothies, but they looked like they were on their way out. Using up these ingredients, even if this didn’t work, I would not have felt bad trashing the banana bread.

GLUTEN-FREE BUTTERSCOTCH CHOCOLATE CHIP BANANA BREAD

  • 1 package live Gfree gluten-free baking mix (1 pound)
  • 3-4 ripe bananas, mashed
  • 3 eggs
  • 1/2 cup milk
  • 2 tablespoons vegetable oil or melted butter
  • 2 teaspoons vanilla extract
  • 1 cup chocolate chips
  • 1 cup butterscotch chips
  • pinch of salt

Preheat oven to 350 degrees. Grease a 9x5x3 loaf pan, set aside. Mix mashed bananas with the baking mix, add remaining wet ingredients one-by one, forming a thick, but smooth batter. Stir in chips and salt. Pour batter into loaf pan. Bake at 350 degrees 45-55 minutes, or until a toothpick inserted in center comes out clean. Be careful not to overbake. Remove from oven, allow to cool about 2 hours before serving.

Tips:

  • “Mix-ins” – can be flavored chips, nuts, dried fruit, etc., instead of the chocolate and butterscotch
  • I used a glass pan only because of what I had on hand. Any loaf pan will do, just double check baking times
  • For storage, the first night I wrapped in tea towels to keep loaf from drying out, but also to retain some crispiness on the edges. After the first night I wrapped in plastic wrap and stored in the fridge
  • When serving, warm a slice of the bread in oven or toaster oven – heat at 200 degrees for about 10-15 minutes. This tastes best when the chocolate is melty and gooey

The verdict? This banana bread was amazing! Gluten-free baking flours and mixes have come such a long way the last few years. I was also impressed with the ingredients in the package – all things I could pronounce and all natural – rice flour, sugar, baking powder, potato starch, salt, and xanthan gum. Also, if I followed a true gluten-free lifestyle, I could probably replicate this baking mix and make it in bulk. However, for its price point (less than $6), I think it’s fine getting the box mix.

IMG_6674

IMG_6678

Gobs of melty chocolate had me drooling!

Other than a subtle grittiness from the rice flour, I could not detect a big difference in taste or texture from traditional banana bread. My boyfriend also said he only knew it was gluten free because I told him.

So, my apologies for referring to the mix as “this garbage” on my Instagram story before I actually used it. I was VERY wrong.

Rework Leftover Risotto – Arancini

Instead of making rice, cooling it, seasoning it, etc, for arancini, why not take a shortcut to enjoy this deep-fried deliciousness sooner? The asparagus risotto from last night was left over and it already has so many of the ingredients you would use if you’re making arancini from scratch – rice, cheeses, seasonings, even some vegetables. While I normally have seen it made with peas, who is stopping me from making an asparagus version?

LEFTOVER RISOTTO ARANCINI

  • 2 cups risotto
  • 3 eggs, divided, beaten
  • 1 cup shredded cheese
  • 1/2 cup flour, seasoned with salt and pepper
  • 1 cup bread crumbs, either Italian seasoned or you can season your own
  • Peanut oil or other high heat oil for frying
  • Grated cheese and tomato sauce for serving, optional

Mix the risotto with one beaten egg. Scooping about 1/4 cup at a time, cup the risotto in one hand and fill with a couple of tablespoons of cheese. Wrap the rice mixture around the cheese until no cheese can be seen, forming a round ball. Lay out shallow bowls or dredging trays – fill one with the flour, the other with the remaining eggs, and the third with the bread crumb mixture. When all the balls have been formed, dredge in flour, dip in the remaining egg mixture to coat, and then toss with the bread crumbs, being sure to coat the entire arancini. You may place in the fridge to cool for a little while, about half an hour, or you may freeze to fry at a later time.

Coat a heavy bottomed or cast iron pot with about 3 inches of oil. Using a candy/deep fry thermometer, heat the oil to at least 350 degrees, but do not exceed 380 degrees. When oil is ready, take arancini out of fridge or freezer, drop in the oil 2-3 balls at a time (do not overcrowd the pot – you want to fry, not steam). Fry about 5 minutes, turning halfway, until the arancini is a deep golden brown. Remove from the oil and drain on paper towels. When ready to serve, dust with a bit of grated cheese and have warm tomato sauce for dipping on the side.

IMG_6745IMG_6746IMG_6747IMG_6755IMG_6758

Asparagus Risotto with Lemon Broiled Shrimp

IMG_4485


Dinner tonight was utilizing one of my boyfriend’s favorite vegetables, asparagus. What’s nice about this dinner is that it can be made in about 45 minutes. It took me a bit longer as I also prepped some banana bread.

IMG_6646

Some old wine from the fridge, asparagus I wanted to use that was still fresh, frozen shrimp, and arborio rice from my pantry

Staying true to my project, all food was things I had on hand. Risotto is one of those foods that is very forgiving – you can almost always add more liquid and ingredients beyond the 1:3 ratio of rice to liquid.

ASPARAGUS RISOTTO WITH LEMON BROILED SHRIMP

  • 2 tablespoons butter
  • 1 tablespoon olive oil
  • 1 medium onion, diced fine or minced
  • 3 cloves garlic, minced
  • 1 cup arborio rice
  • 3 cups water, broth, and/or wine (I used 1 cup wine and two cups water, plus bouillon packets)
  • 2 lemons, zested and juiced (set aside zest and about 1/4 of juice)
  • 1 bunch asparagus, trimmed and chopped in bite sized pieces
  • 1/4 cup parmesan cheese
  • 2 ounces cream cheese
  • Salt and Pepper, to taste
  • Shrimp, thawed and trimmed – about 3 ounces per serving
  • Olive oil, as needed

Melt butter and heat oil over medium to high heat in a large saute pan. Add onions and garlic, sweat until translucent, about 2-3 minutes. Add rice and saute another minute. Stir in liquid and 3/4 of lemon juice and bring to a boil, stirring occasionally. Lower heat to a simmer and cover pan. Cook the rice until tender, about 20 minutes, stirring occasionally. If rice mixture feels too thick and difficult to stir, add a bit more liquid, ideally water or broth. Stir in asparagus and cook until it starts to soften but not totally tender (asparagus will continue to cook when rice is removed from heat) – about 3-4 minutes. Stir in cheeses and half the lemon zest and blend until cream cheese is fully incorporated.

Meanwhile, lay the shrimp on a foil-lined baking sheet. Brush the shrimp with olive oil and sprinkle both sides with salt, pepper, and lemon zest. When you’re ready to serve, broil on high about 5 minutes, flipping the shrimp about halfway through cooking. Remove from broiler and pour remaining lemon juice over the shrimp.

To serve, scoop about a cup to a cup and a half of risotto into a bowl, arrange a few shrimp on top.

TIP – Risotto can be leftover and reheated. Ideally, make shrimp when you are ready to eat.

IMG_6669

Cleaning, Reorganizing, and Taking Inventory of My Pantry

I’m not much of a video person, and this is about 7 minutes of my stream of consciousness of what I’m about to tackle. And it was all done by me on my iPhone and I don’t have editing or framing skills. Either way, being home has helped me tackle the project of cleaning and re-organizing my pantry. I found items that expired in 2017 and 2018.

After I clean my shelves, I’ll take stock of everything I have. I pledge not to replace anything major until I have exhausted what I have on hand. For example, I won’t go out and buy beans before I use all the beans I have. For snacks, I won’t buy anything new until I have exhausted a category (nuts, chips, cookies, etc).

I plan to get creative and think outside of the box with some substitutions. Reach out if you’re stuck or feeling uninspired.

Kiss Me, I’m NOT Irish – Leftover Mashed Potato Cakes

IMG_3955

Reworks are a lot of fun. Taking something you’re bored of and transforming it to something new, with just a few ingredients.

I love vegetable fritters, my favorite is kolokithokefthedes (Greek zucchini fritters). Regardless of the culture or flavors, they all seem to have the same thing in common – you need the base, seasoning, and something to bind it to keep it all together. The binders are usually pantry and fridge staples –  eggs and flour. Different lifestyles (vegan, gluten-free) may have different binders, but the theory is all the same – you don’t want these falling apart in your skillet or oven.

In honor of Saint Patrick’s Day, I thought some sort of “Irish” breakfast would be fun. I use Irish loosely, as these cakes have potatoes, bacon, and cheese and typically anything served with eggs can be interpreted as breakfast.

IMG_6443

Mashed Potato Cakes served with Scrambled Eggs and Sour Cream

My current series of posts will be all about taking advantage of what you already have on hand – this will save money, allow you to be less wasteful, and explore your creative side in times when it’s encouraged not to leave the house.

Over the weekend I made some mashed potatoes. I probably had 2 cups worth leftover but wasn’t in the mood to eat them in their current state. In my fridge I had all the fixings for “loaded” potatoes, so these came together quite simply.

LEFTOVER MASHED POTATO CAKES – makes 8 cakes/fritters

  • 1 cup mashed potatoes
  • 1/2 cup shredded cheddar cheese
  • 1/4 cup chopped scallions
  • 3 slices bacon, cooked and chopped
  • 1 egg, beaten
  • 1/4 cup flour

In a medium mixing bowl, combine mashed potatoes, cheese, scallions, and bacon. Add egg until fully incorporated. Whisk in flour until a thick batter forms.

Heat a skillet with 2-3 tablespoons oil. Using a large spoon, drop a large spoonful into cooking oil, forming an approximately 3-inch disk. Fry on both sides until golden brown, drain excess oil on paper towels. Serve with sour cream.

Substitutions – remember this recipe is about technique, it’s not an exact science

  • Play around with the flavors and seasonings. Use what you have at home. Onions, garlic, cream cheese, ham, chopped peppers/hot peppers etc. all work
  • These do not need to be fried! Form the cakes with a touch more flour, brush with oil, and bake at 375 F until golden brown
  • Play around with binders – a bit more flour and some milk instead of egg for those averse to eggs. Up the cheese and eggs, or use gluten-free all-purpose flour for gluten-free. Eliminate dairy and eggs for a vegan version

Ask Anna – I’m Here to Help

IMG_4485

I cannot believe my last post on this blog was back in 2016. And yet, I can believe it. 2016 was the year I was licensed in real estate and also the year I decided to leave retail management for good. As I was building my real estate business, the time for blogging about food subsided. I traded lengthy articles with recipes for quick instagram posts, focusing mainly on the visual, occasionally sharing how things were done.

One of my New Years resolutions in 2019 was to get back in the habit of blogging.  I showed some new friends my old stuff and they were anxious for more. On a happy note for my career, 2019 was my best year in real estate to date, and I just wasn’t home cooking as much, let alone writing about it. I literally traded writing contracts and client emails for recipes.

Life is short, and it’s important to attribute time to your hobbies and passions. With all the fear and uncertainty in the world, especially here in the United States and we are navigating this COVID-19 Pandemic and all the self-quarantine going on around us, I realized I am in a position to help people. This isn’t any sort of grand nobel-peace prize actions. I just have a quirky and unique skill set when it comes to food.

Yesterday at least 3 friends reached out looking for cooking help or advice. As supermarket supplies dwindle and more restaurants shut their doors, cooking well and at home for your family with what you have on hand can be challenging or difficult. I lived through the great recession and I also suddenly lost a very lucrative position in 2015 – both incidents that taught me to be very thrifty and frugal with my food budget, but also creative. You may look at a jar of tahini and think, I don’t even have chickpeas, I only use this stuff for hummus. I will look at that same jar and make sesame noodles, tahini chocolate chip cookies, salad dressing, and more.

Reach out if you’re stuck, I’ll help you find inspiration on a shoestring budget.